Hi there,
Salesforce has been adding some amazing generative AI features lately, and Flex Prompt Templates are definitely one of the most powerful. They give you the ability to write clear, reusable prompts that can be used almost anywhere — Flow, Apex, OmniStudio, or even external systems. The best part? They accept dynamic Salesforce data as inputs, so your output stays contextual and consistent every time.
In this blog, we’ll walk through a real, practical use case: generating a clean and professional Case Summary automatically using a Flex Prompt Template + a Record-Triggered Flow.
By the end, you’ll have:
- A fully working Flex Prompt Template
- A flow that calls the template automatically
- A rich text summary field filled with formatted, AI‑generated insights
Let’s get started.
Enable Einstein for Prompt Builder
Before you can create Flex Prompt Templates, ensure that Einstein for Salesforce is enabled in your org. Without this, the Prompt Builder features won’t appear.
To enable it:
- Go to Setup.
- Search for Einstein.
- Open Einstein Setup.
- Toggle On “Turn on Einstein“.

Once enabled, you’ll be able to access Prompt Builder and create different types of templates and test them directly.
What Are Flex Prompt Templates?
Flex Prompt Templates are AI instruction sets that you create once and then reuse anywhere in Salesforce. They support up to five input resources, which means you can pass in records, text values, lists, or even variables. These inputs enable the LLM to comprehend the context and produce meaningful output.
Why are they useful?
- You write the logic once — Flow or Apex can call it anytime.
- They keep your AI output consistent and predictable.
- You can use them across orgs as part of managed packages.
- Output can be stored in any text or rich text field.
This makes them perfect for summaries, explanations, categorisation, rewriting, or even multi-step reasoning.
Our Use Case: A Clean, Readable Case Summary
Support teams spend a significant amount of time manually summarising cases. With a Flex Prompt Template, we can automate that completely.
Our goal:
- Read details from a Case record
- Generate a structured, formatted summary in HTML
- Highlight urgency using Priority
- Provide three next steps for an agent
- Handle missing fields gracefully (ignore blanks)
We’ll then trigger this template automatically whenever a case is created.
Step 1: Create the Flex Prompt Template
Before building the flow, start by creating a Flex Prompt Template that will generate the Case Summary.
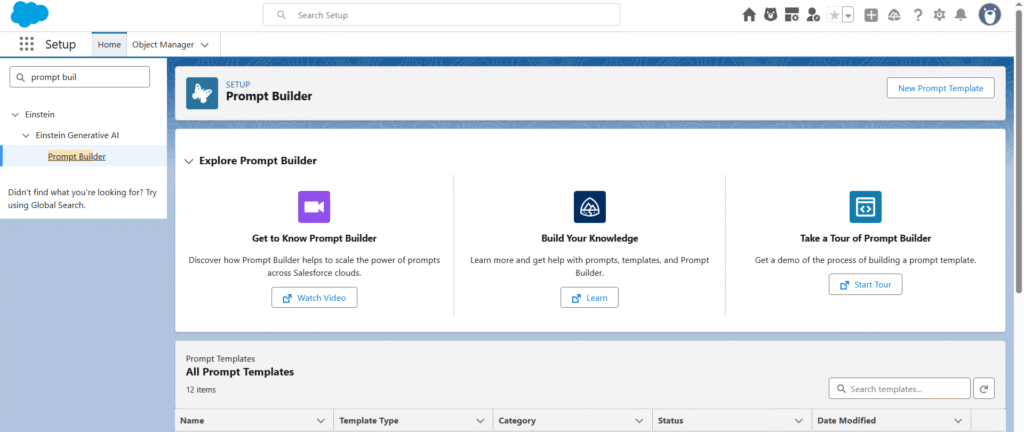
1. Navigate to Prompt Builder
- Go to Setup in Salesforce.
- In the Quick Find box, search for Prompt Builder.
- Click Prompt Builder to open the workspace.
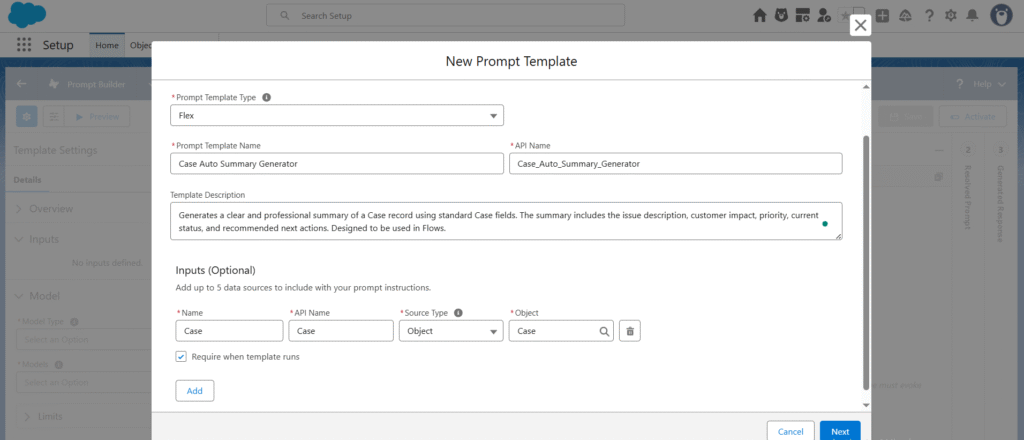
2. Create a New Prompt Template
- Click New Prompt Template.
- Salesforce will ask you to choose a template type — select Flex.
- Flex templates are reusable and can be called from Flow, Apex, OmniStudio, or any LLM-powered automation.
3. Fill Out Template Details
- Template Name: Case Auto Summary Generator
- API Name: Case_Auto_Summary_Generator
- Description: Generates a clear and professional summary of a Case record using standard Case fields. The summary includes the issue description, customer impact, priority, current status and recommended next actions. Designed to be used in flows.
4. Configure Input Resources
- Click Add Input Resource.
- Choose Record as the resource type.
- Select Case as the object.
- Mark the Case input as Required so the template cannot run without a Case record.
Flex Prompt Templates allow up to five input resources, but for this use case, we only need one.
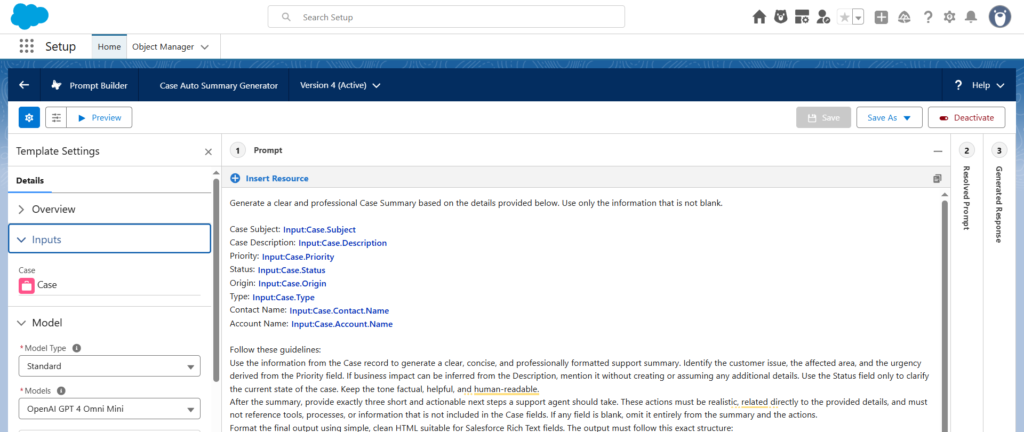
5. Add the Prompt Instructions
Paste the following instructions into the main Prompt section:
Generate a clear and professional Case Summary based on the details provided below. Use only the information that is not blank.

Case Subject: CASE_SUBJECT
Case Description: CASE_DESCRIPTION
Priority: CASE_PRIORITY
Status: CASE_STATUS
Origin: CASE_ORIGIN
Type: CASE_TYPE
Contact Name: CONTACT_NAME
Account Name: ACCOUNT_NAME

Follow these guidelines:

Use the information from the Case record to generate a clear, concise, and professionally formatted support summary. Identify the customer issue, the affected area, and the urgency derived from the Priority field. If business impact can be inferred from the Description, mention it without creating or assuming any additional details. Use the Status field only to clarify the current state of the case. Keep the tone factual, helpful, and human-readable.

After the summary, provide exactly three short and actionable next steps a support agent should take. These actions must be realistic, related directly to the provided details, and must not reference tools, processes, or information that is not included in the Case fields. If any field is blank, omit it entirely from the summary and the actions.

Format the final output using simple, clean HTML suitable for Salesforce Rich Text fields. The output must follow this exact structure:

A bold heading: Case Summary (you may add a small relevant emoji like ⚠️ if Priority is High)

A readable summary paragraph of 3–4 sentences, with natural flow, clear line breaks using <br> where appropriate, and no repetitive phrasing.

A bold heading: Recommended Actions

A bulleted list using <ul><li> with exactly three practical next steps (you may use light emojis such as 📝 or 🔧 to enhance clarity).

Do not use inline CSS, colors, fonts, or any styling other than <b>, <br>, <ul>, and <li>. Avoid overuse of emojis — keep them minimal and professional.
Step 6: Replace Placeholder Text Using Add Resources
Before finalising the prompt, we need to replace all placeholder words (like CASE_SUBJECT, CASE_DESCRIPTION, etc.) with actual Case merge fields.
To do this:
- Click on + Insert Resource inside the Prompt Builder editor.
- Select Case as your input resource.
- Now choose the appropriate Case fields one by one and insert them directly into the prompt where needed.
- Replace all placeholder text with the resources you inserted.
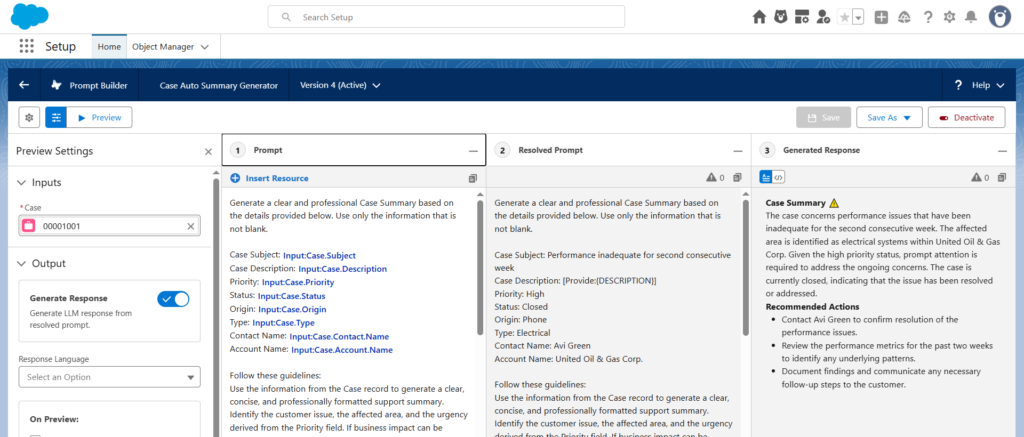
Step 7: Save & Preview the Prompt Template
After inserting all merge fields:
- Click Save & Preview.
- In the Preview Settings, select a sample Case record.
This allows you to see how the summary will look with real data. - Review the preview output carefully — formatting, emojis, HTML tags, and summary quality.
Step 8: Activate the Template
Once you’re satisfied with the output:
- Click Activate.
- Your Flex Prompt Template is now available for use in Flow, Apex, Bots, OmniStudio, or any other supported automation.
This completes the template setup.
Step 2: Build the Flow That Uses the Prompt Template
Now that our Flex Prompt Template is ready, the next step is to automate the summary creation using a Record-Triggered Flow on the Case object.
We’ll break this into clear steps.
Step 2.1 — Create a New Record-Triggered Flow
- Go to Setup → Flows → New Flow.
- Select Record-Triggered Flow.
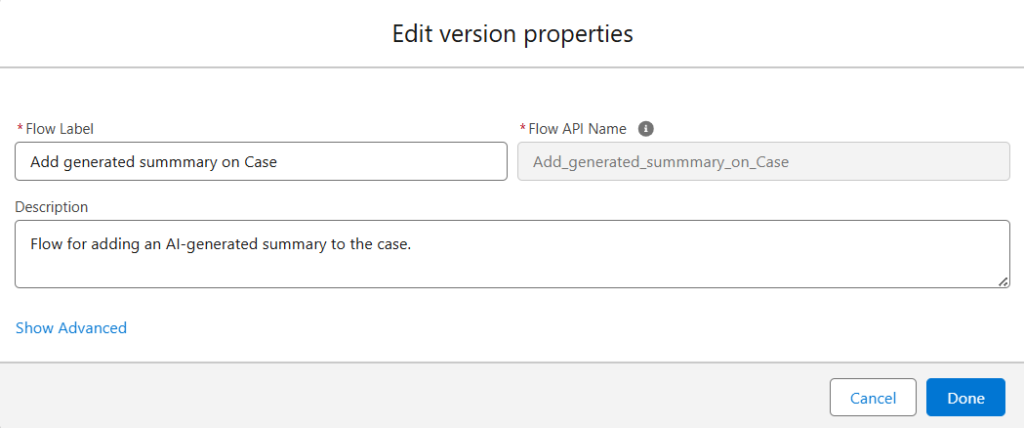
- Fill in the basic flow details:
- Flow Name: Add Generated Summary on Case
- API Name: Add_Generated_Summary_on_Case
- Description: Flow for adding an AI-generated summary to the case.
- Configure the trigger:
- Object: Case
- Trigger: When a record is created
- Optimise For: Actions and Related Records
(because we need to call an Action that invokes the Flex Prompt Template)
Step 2.2 — Add the Action Element to Call the Prompt Template
- Click + on the canvas and select Action.
- In the Action list, select your Flex Prompt Template:
Case Auto Summary Generator. - For the Case Input Resource, select:
$Record (Triggering Case)
This passes the runtime Case context to the LLM, so the summary is generated using real values.
No need to manually assign variables — the output automatically becomes available as the template’s Prompt Response.

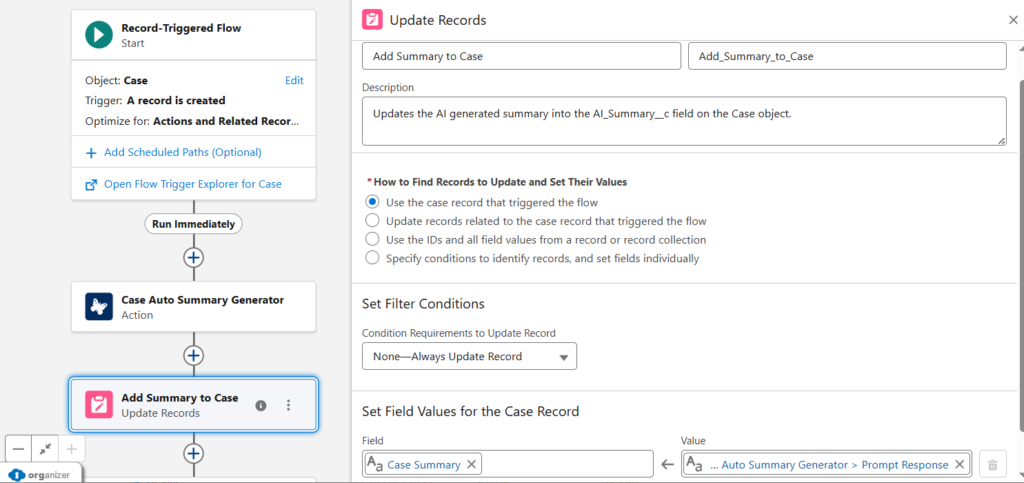
Step 2.3 — Add an Update Records Element
- Click + again and choose Update Triggering Record.
- Configure it as:
- Label: Add Summary to Case
- API Name: Add_Summary_to_Case
- Description: Updates the AI-generated summary into the AI_Summary__c field on the Case object.
- Filter Conditions: None (we are updating the same record)
- In the Field Update section:
- Select your rich text field: Case Summary
- For the value, enter:
Outputs from Case Auto Summary Generator.promptResponse
This inserts the output generated by the LLM directly into the Case Summary rich text field.
Step 2.4 — Save and Activate
Click Save, then Activate.
Your automation is now live!
From this point forward, every newly created Case will automatically receive a clean, formatted AI-generated summary—without any manual effort.
Step 3: Test the Flow
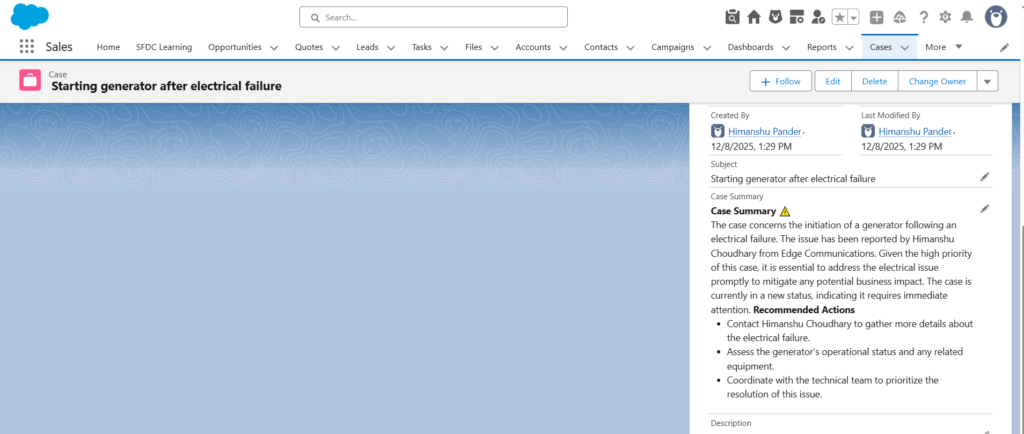
Create a new test Case.
Within a second, you’ll see a clean, formatted, AI‑generated summary in your rich text field.
No manual writing, no repetition, no inconsistent formatting.
Final Thoughts
Flex Prompt Templates unlock a powerful new way to automate your org with AI. When combined with Flow, they can dramatically reduce repetitive tasks and generate consistent summaries, insights, and recommendations.
This single use case can be extended to many others:
- Lead or Opportunity summaries
- Account intelligence briefs
- Email drafts and responses
- Qualification checklists
- Data normalisation or rewriting
With Flex Prompt Templates and Flow working together, you can bring AI directly into your day-to-day Salesforce processes with almost no extra effort. I hope this walkthrough helps you implement your own smart automations.
Thanks for reading! See you in the next blog.