Welcome, fellow Salesforce adventurers! Ever wished you could wave a magic wand and pull data from one object to another? Well, Cross Object Formula Fields are about as close to magic as Salesforce gets! In this blog, we’ll dive into the enchanting world of Cross Object Formula Fields, complete with a step-by-step guide using our trusty Account and Project objects. Buckle up—it’s going to be a magical ride!
What Are Formula Fields in Salesforce?
Let’s start with the basics. Formula Fields are like the secret sauce of Salesforce—they automatically calculate values based on other fields, saving you from the dreaded manual entry. Think of them as your very own math nerds, working tirelessly in the background.
Pro Tip: Formula Fields are always read-only. They’re like those “Look, but don’t touch” exhibits in a museum—no matter how much you want to, you just can’t change the values directly.
The Magic of Cross-Object Formula Fields in Salesforce
Now, imagine you’ve got two objects—Account and Project—and you’re itching to display the Account Industry on your Project record. But wait, you don’t want to copy the data manually. Enter Cross Object Formula Fields, your Salesforce spell to magically pull data from one object and display it in another. 💫
Cross Object Formula Fields are like the enchanted bridges between objects. They’re created on the child object (our beloved Project) and can fetch data from the parent object (the mighty Account).
These fields are versatile, working with both Lookup and Master-Detail relationships. So whether your objects are best buds or just casual acquaintances, Cross Object Formula Fields has got you covered.
Cross Object Formula Fields vs. Roll-Up Summary Fields: The Ultimate Face-Off
In the land of Salesforce, both Cross Object Formula Fields and Roll-Up Summary Fields are powerful warriors, but they wield different weapons. Here’s a quick showdown:
Cross-Object Formula Fields:
- Purpose: Used to display data from a related object on a child object. For example, showing the Industry field from the Account object on a Project object.
- Data Type: Formula field that provides real-time data based on the formula you define.
- Relationships: Can be used with both Lookup and Master-Detail relationships.
- Field Location: Created on the child (many-side) object.
- Functionality: Displays values dynamically and instantly reflects changes from the related object.
- Limitations: Cannot perform aggregations or calculations on related records. Always read-only.
Roll-Up Summary Fields:
- Purpose: Used to aggregate data from child records and display the result on the parent record. For example, calculating the total number of Projects related to an Account.
- Data Type: Summary field that aggregates data from child records.
- Relationships: Applicable only with Master-Detail relationships.
- Field Location: Created on the parent (one-side) object.
- Functionality: Performs aggregations such as SUM, COUNT, MIN, and MAX on related child records.
- Limitations: Cannot be used with Lookup relationships and does not support real-time data from the child records. Aggregation is updated only when child records are added or modified.
In essence, Cross-Object Formula Fields allow you to pull and display specific data from a related object, while Roll-Up Summary Fields aggregate data from multiple child records to summarize information on a parent record.
Stay tuned for a deep dive into Roll-Up Summary Fields in an upcoming blog. Trust us, you won’t want to miss it!
How to Create a Cross-Object Formula Field in Salesforce: The Magic Formula
Ready to conjure up some Salesforce magic? Here’s how you can create a Cross Object Formula Field to display the Account Industry (a picklist field) on your Project object.
Step 1: Grab your wizard hat and navigate to the Project object.
Step 2: Head over to the Fields & Relationships section and click “New Field.”
Step 3: Choose Formula as the data type and name your field something fancy like Account Industry.
Step 4: Select “Text” as the formula return type. (Because we’ll be displaying text values from the picklist.)
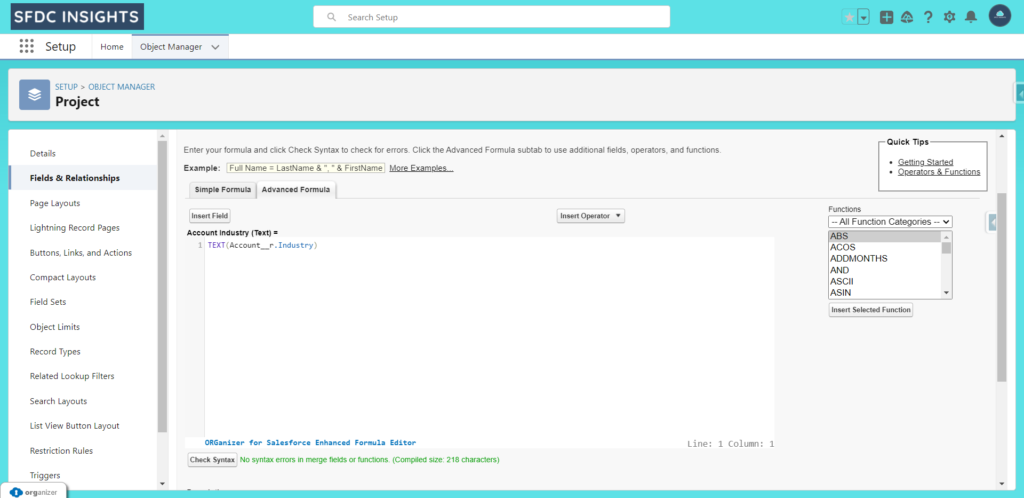
Step 5: In the formula editor, get ready for some wizardry. Click the Insert Field button to navigate through the related fields. Select Project > Account > Industry.
Step 6: Since Industry is a picklist field, you’ll need to convert the picklist value into text. Use the TEXT() function in your formula to do this:
TEXT(Account.Industry)
Step 7: While in the formula editor, you might need to decide how to handle blank fields. You can either treat blank fields as zero or leave them blank. This option will be in the field settings, so choose the one that best fits your data needs.
Step 8: Once you’ve entered the formula, click the Insert button. Watch as the formula editor magically populates with the correct path to the field.
Step 9: Now, don’t just stop there—give your formula a little extra TLC by clicking the Check Syntax button. This ensures that your formula is as flawless as a spell in Harry Potter. If everything looks good, you’ll see a green “No syntax errors in merge fields” message.
Step 10: Scroll down a bit, and you’ll find an option to add a Description or Help Text. This is where you can drop a few hints for future users—or leave a witty comment for yourself. It’s like leaving a magical note for your future self.
Step 11: Click Next to proceed to the field-level security settings. Choose which profiles should have visibility to this field and adjust as necessary.
Step 12: Click Next again to select the page layouts where this field should appear. Make sure to add it to the relevant layouts to ensure it shows up where needed.
Step 13: Finally, click Save to complete the process. Your Cross Object Formula Field is now live and ready to display the Account Industry on your Project records!

See the Magic in Action: Check Your Project Record!

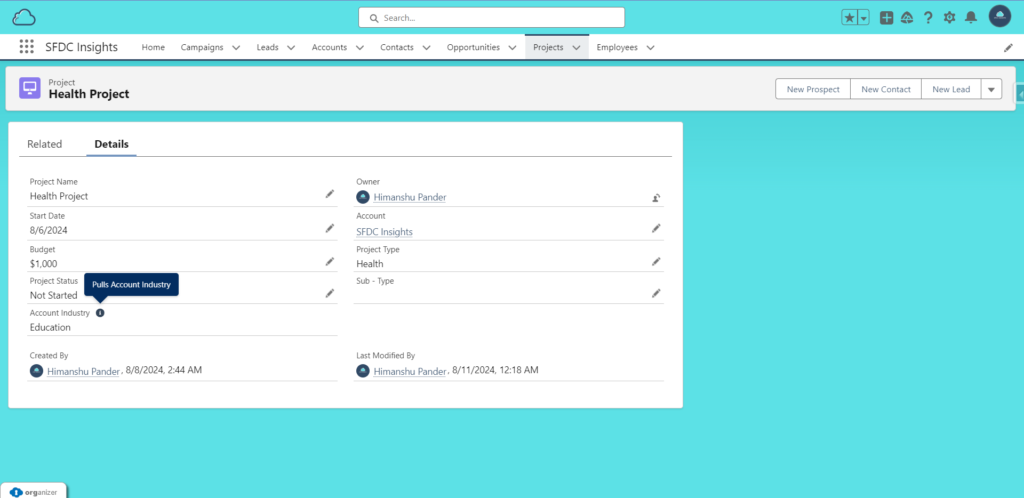
Now that you’ve created your Cross Object Formula Field, it’s time to see the magic in action. Visit the Project record related to an Account with an industry specified. For example, if you look at the Project record related to SFDC Insights, you should see the Industry field displaying “Education” from the associated Account.
Hop over to your Project records, and marvel at how the Account Industry field now shows the correct industry value right on the Project page. It’s like having a little bit of Salesforce magic right at your fingertips!
Conclusion:
And there you have it—a fun and easy guide to mastering Cross Object Formula Fields in Salesforce! These fields might not actually be magic, but they’re pretty close. Whether you’re a Salesforce newbie or a seasoned pro, Cross Object Formula Fields can help you pull off some serious data wizardry. And remember, we’ll be conjuring up a detailed blog on Roll-Up Summary Fields soon, so stay tuned to SFDC Insights!
Until next time, keep the Salesforce magic alive! ✨
Do you have Questions or Feedback?
If you have any questions or need further clarification, feel free to drop a comment below. We’d love to hear from you!
A big thank you for reading and supporting SFDC Insights. Your engagement makes the magic happen!


