Hi there,
Today, we’re diving into one of Salesforce’s powerful tools: Schema Builder. This guide will cover everything you need to know about Schema Builder, including its functionality, usage, and benefits. Let’s get started!
What is Schema Builder?
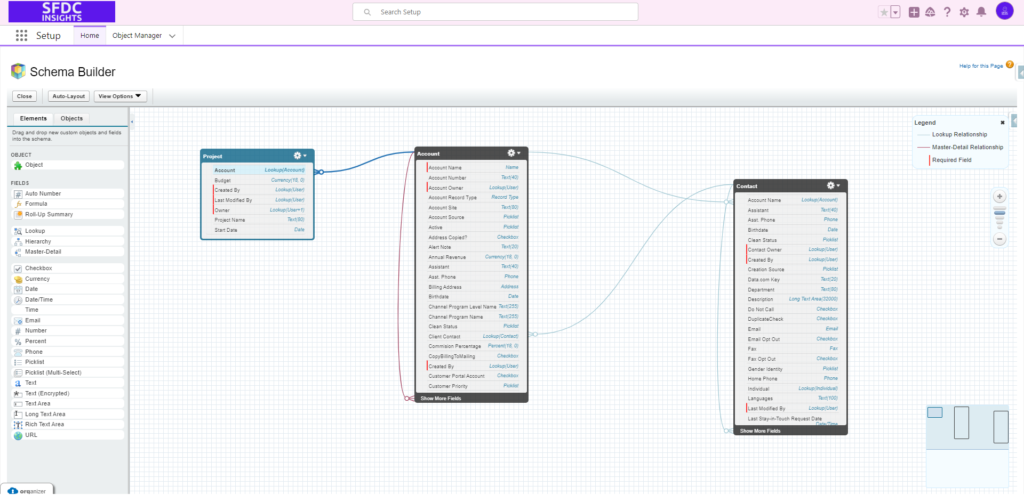
Schema Builder is a dynamic tool in Salesforce that allows you to visualize and manipulate your data model. It provides a graphical interface for designing and understanding complex data models, making it easier to see how different objects relate to each other.
What Can You Do with Schema Builder?
With Schema Builder, you can:
- Create and Edit Objects: Create new custom objects or edit existing ones directly from the Schema Builder interface.
- Add and Modify Fields: Easily add new fields to your objects or modify existing fields.
- Define Relationships: Establish relationships between different objects, such as creating lookup or master-detail relationships.
- Visualize Data Models: View a graphical representation of your data model, helping you understand the structure and relationships of your objects.
- Manage Schema in Real-Time: Changes made in Schema Builder are immediately reflected in your Salesforce environment, providing real-time updates to your data model.
How to Use Schema Builder?
Let’s walk through the steps to use Schema Builder effectively:
Accessing Schema Builder:
- Navigate to Setup.
- In the Quick Find box, type Schema Builder.
- Click on Schema Builder.
Navigating the Interface:
- The Schema Builder interface includes a Canvas where your data model is visualized.
- The Object Elements panel on the left allows you to drag and drop objects and fields onto the canvas.
- Use the Filter panel to include or exclude specific objects from your view.
Creating a New Object:
- Click on the Elements tab on the left panel.
- Drag the Object element to the canvas.
- Fill in the details for your new object, such as the Label, Plural Label, and Object Name.
- Click Save.
Adding Fields to an Object:
- Select the object you want to add fields to by clicking on it in the canvas.
- Drag a field type (e.g., Text, Number, Date) from the Elements panel to the object.
- Fill in the field details and click Save.
Defining Relationships:
- To create a relationship, drag the appropriate relationship field (Lookup or Master Detail) to the object.
- Select the related object and configure the relationship settings.
- Click Save.
Example: Creating a Custom Object with Fields
Let’s create a custom object called “Project” with a few fields.
Create the Project Object:
- Drag the Object element to the canvas.
- Name the object “Project” with a plural label of “Projects”.
- Click Save.
Add Fields to the Project Object:
- Drag the Text field to the Project object.
- Name the field “Project Name” and make it required.
- Drag the Date field to the Project object.
- Name the field “Start Date”.
- Drag the Currency field to the Project object.
- Name the field “Budget”.
Define a Relationship:
- Drag the Lookup Relationship field to the Project object.
- Select the related object (e.g., Account) and configure the relationship settings.
- Click Save.

Conclusion
Schema Builder is a versatile tool that simplifies the process of designing and managing your data model in Salesforce. Its intuitive interface and real-time updates make it an essential tool for administrators and developers alike. By following this guide, you can leverage Schema Builder to create and manage objects, fields, and relationships effectively.
Stay tuned for more insightful blogs on Salesforce development and administration!
Happy modeling!


