Hi there! Today, let’s talk about something that genuinely makes our Salesforce life easier — Dynamic Forms. If your record pages ever felt long, messy, or full of fields nobody needs, this blog will help you fix that cleanly and simply.
What Exactly Are Dynamic Forms?
The easiest definition:
Dynamic Forms let you control which fields appear on a record page, based on conditions you choose.
Think of them as:
- Flexible field sections
- Smarter page layouts
- Personalised views for every user
No more 50-field layouts where everything shows at once. You decide what appears, where it appears, and when it appears.
Why Should You Even Use Dynamic Forms?
Because your users deserve clean pages — and you deserve fewer layout headaches.
Dynamic Forms help you:
- Show only the fields that matter at that moment
- Create shorter, easy-to-read record pages
- Personalise UI based on profile, device, or field values
- Hide advanced fields until they’re needed
- Improve overall user experience
Honestly, once you start using them, you won’t go back.
Which Objects Support Dynamic Forms?
Today, Salesforce supports Dynamic Forms for:
- All Custom Objects
- Most standard objects like
- Account
- Contact
- Lead
- Opportunity
- Case
- And many more
Support is increasing with every release.
How to Enable Dynamic Forms
- Go to Setup
- Open Lightning App Builder
- Pick any record page
- If the page supports it, you’ll see a button saying:
“Upgrade Now” - Click Upgrade Now
Salesforce will automatically convert your old layout into Field Sections and Individual Fields.
From here, you can drag, drop, show, or hide fields just the way you want.
A Simple Example — Show the “Budget” Field Only When Project Type = Education
Let’s walk through a practical example using your Project object.
The requirement is:
Display the Budget field only when the Project Type is “Education”.
This is a perfect use case to understand how Dynamic Forms work.
1. Navigate to Lightning App Builder
- Log in to your Salesforce org.
- Click the Setup gear icon in the top right.
- Select Setup.
- In the Quick Find search box on the left, type Lightning App Builder.
- Open the Lightning App Builder page.
You will now see a list of Lightning Pages in your org.
2. Open or Create the Project Record Page
Look for an existing Project Record Page:
- If it exists, click Edit next to it.
- If it does not exist, click New (top right).
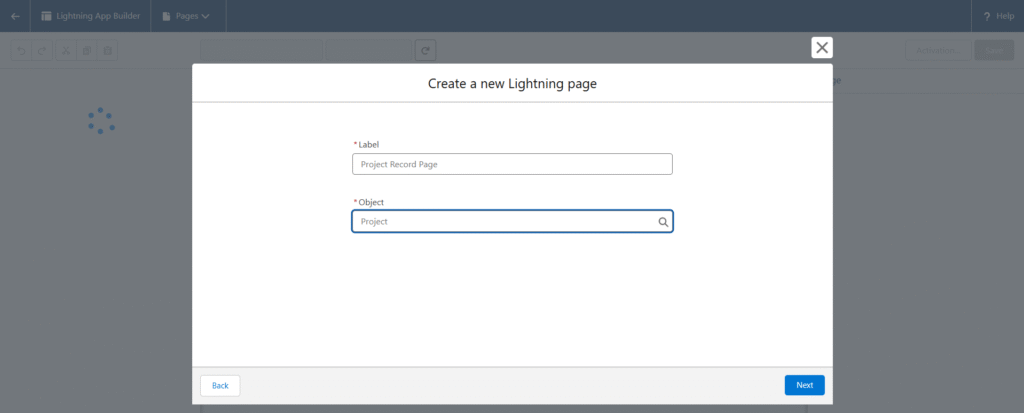
If you are creating a new page:
- Choose Record Page.
- Select the Project object.
- Give the page a name, such as “Project Record Page.”
- Click Next to enter the Lightning App Builder editor.
- Click on “Clone Salesforce Default Page” and then click “Finish.”
3. Upgrade the Existing Salesforce Record Page to Dynamic Forms
Instead of manually adding Field Sections, we will use Salesforce’s built-in upgrade tool. This ensures that your new Dynamic Forms page inherits all fields, sections, buttons, and related metadata from the original page layout.
Follow these steps:
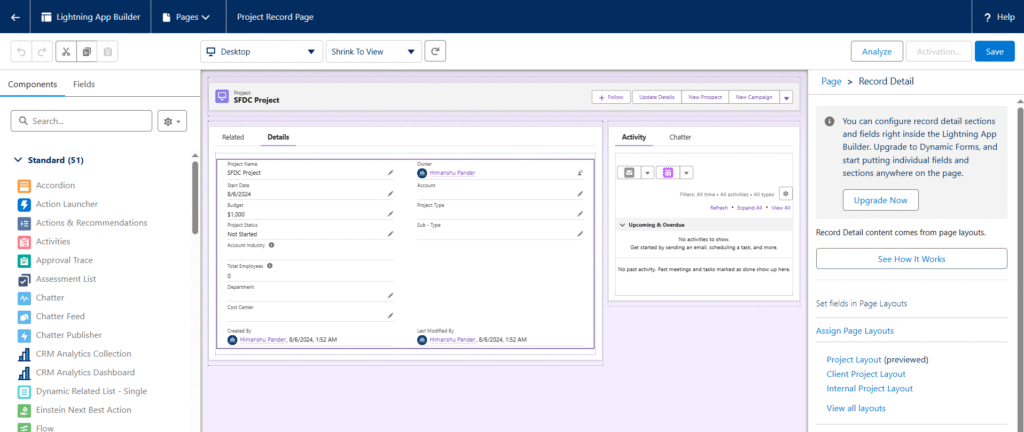
- Inside Lightning App Builder, open your Project Record Page.
If this is your first time opening it, Salesforce will show the standard view with the default layout. - Look for the banner or option that says “Upgrade Now”.
This appears whenever Dynamic Forms are available for that object. - Click Upgrade Now.
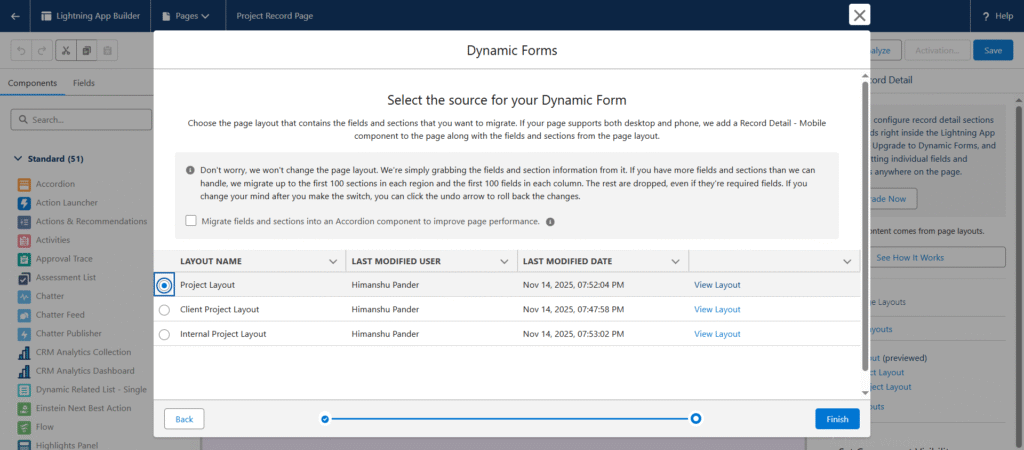
- Salesforce will ask you to choose a Source Page Layout.
This is the page layout from which all fields, sections, buttons, and related lists will be imported.
Select your existing page layout (for example: Project Layout). - Click Finish or Next, depending on the prompt.
Salesforce will automatically convert the selected page layout into:
- Field Sections
- Individual Fields
- Tabs (if applicable)
- Buttons
This gives you a clean foundation to start applying visibility rules and rearranging fields using Dynamic Forms.
Once the upgrade is complete, you can proceed to select any field and apply conditional visibility — including the Budget field example.
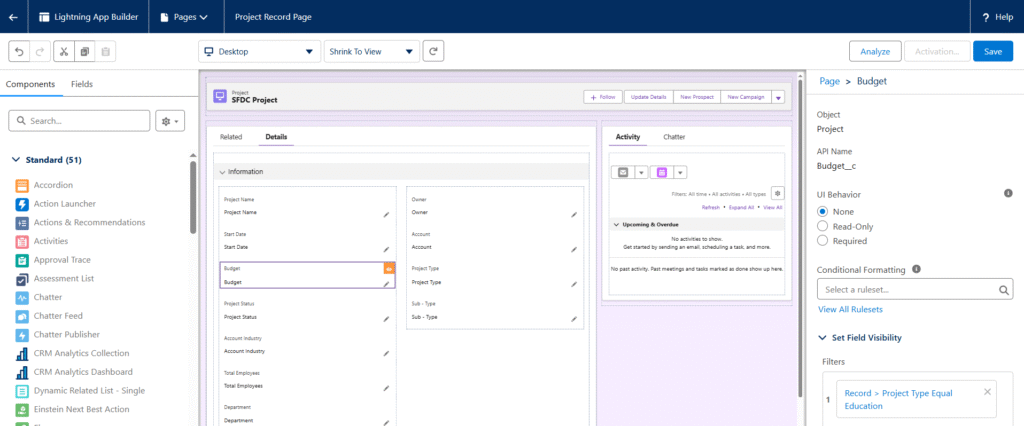
4. Apply Visibility Rules to the Budget Field
This step controls when the field should appear.
- Click the Budget__c field on the canvas.
- On the right side panel, scroll to the Set Visibility section.
- Click Add Filter.
- Configure the condition as follows:
- Field: Project Type
- Operator: Equals
- Value: Education
This ensures the Budget field only appears when the user selects “Education” in the Project Type field.
5. Save and Activate the Page
- Click Save in the top right corner.
- Click Activate.
- Select where you want this page to be used (for example, Org Default).
- Click Save again.
The dynamic form is now active for your Project object.
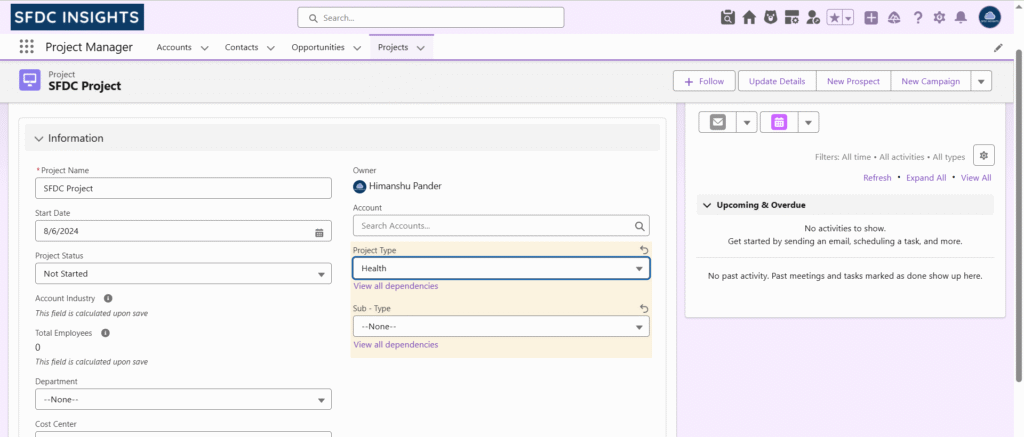
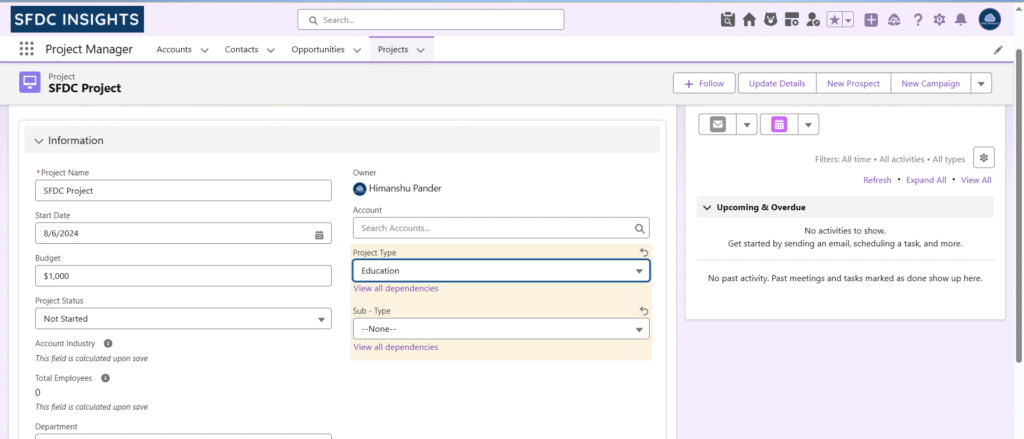
6. Test the Result
- Open any Project record.
- Change Project Type to Education — the Budget field will appear.
- Change Project Type to any other value — the Budget field will disappear.
This confirms that your visibility rule is working correctly.
What Kind of Visibility Rules Can You Use?
You can show or hide fields based on:
- Picklist values
- Record type
- Checkbox fields
- User profile
- Permission sets
- Device (mobile/desktop)
- AND / OR logic
This means your page can be as smart as your business needs.
What I Personally Love About Dynamic Forms
- No need to maintain multiple page layouts
- Pages look neat and professional
- Users only see what’s important
- Easy to update anytime
- No coding required
- Perfect for demo-ready UI
Honestly, they make admin work feel satisfying.
A Few Things to Keep in Mind
- Some standard objects still don’t support it
- You still need page layouts for related lists
- Very old Lightning pages may behave differently on mobile
But overall, Dynamic Forms are stable, modern, and worth using everywhere.
Final Thoughts
Dynamic Forms are one of those features that seem small but change everything.
Once you start building smarter layouts, you’ll realise how simple and powerful record pages can be.
If you haven’t tried them yet, open Lightning App Builder and play with them. You’ll enjoy the flexibility.
Thank you for reading! If you found this helpful, feel free to explore more Salesforce articles on SFDC Insights.